Other Blog Posts
- 15 Sep 2020» Laravel and Pusher Chatroom App Part 6
- 14 Sep 2020» Laravel and Pusher Chatroom App Part 5
- 13 Sep 2020» Laravel and Pusher Chatroom App Part 4
- 12 Sep 2020» Laravel and Pusher Chatroom App Part 3
- 11 Sep 2020» Laravel and Pusher Chatroom App Part 2
- 10 Sep 2020» Laravel and Pusher Chatroom App Part 1
- 01 Feb 2018» 10 Things I've Learned about Drupal 7
- 27 Jan 2018» Greater Understanding
- 20 Jan 2018» Working with JSON
- 13 Jan 2018» Expanding JavaScript Knowlege
- 05 Jan 2018» Hiring Someone with 0 Years Experience
- 30 Dec 2017» New Year Resolutions
- 23 Dec 2017» Twitter Bot
- 16 Dec 2017» Twitter Search
- 22 Oct 2017» TimeOut
- 21 Sep 2017» My First Week of Bootcamp
A Simple Chatroom Application with Laravel and Pusher(Part 4)
A quick review… I came across an example for a chatroom app that utilized Laravel and Pusher, a connection and messaging app that provides real-time content relay. It also touches on several features within Laravel, such as database connection, model generation, Vue.js integration, and eventing. If you haven’t started yet, go to Part 1 in this series to get started.
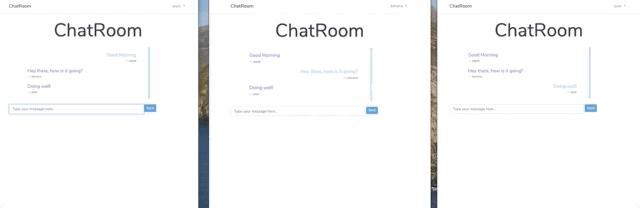
Chat View
Create a view called chat.blade.php in app/resources/views to display the chat room. This file can be done in many different ways. Here is how I did it:
// app/resources/views/chat.blade.php

@extends('layouts.app')

@section('content')

<div class="display-3 text-center">ChatRoom</div>
<div class="container">
    <div class="row">
        <div class="col-md-10 col-md-offset-1">
            <div class="chat-block p-4">
                <chat-messages :messages="messages" class="messages"></chat-messages>
            </div>
            <div class="panel-footer">
                <chat-form
                    v-on:messagesent="addMessage"
                    :user=""
                ></chat-form>
            </div>
        </div>
    </div>
</div>
@endsection
And the corresponding style in app/resources/sass/app.scss :
.text-right {
    text-align: right;
}


.blockquote {
    margin: 15px;
    color: $purple

}
.user-color {
    color: $cyan;
}
.chat {
    overflow-y: scroll;
    max-height: 400px;

}

.chat::-webkit-scrollbar {
    width: .5em;
}

.chat::-webkit-scrollbar-track {
    -webkit-box-shadow: inset 0 0 6px $blue;
    border-radius: 10px;
    background-color: #F5F5F5;
}

.chat::-webkit-scrollbar-thumb {
    border-radius: 10px;
    -webkit-box-shadow: inset 0 0 6px $gray;
    background-color: $cyan;
}
Again, this can really look however you want it to but the important pieces are @extends ('layouts.app') which maintains the key pieces of the rest of the site.
The
  @section('content')
	// code....
  @endsection
which defines where this blade file should insert itself into the layouts/app.blade.php file.
And the <chat-form> and <chat-messages> elements which are Vue components we still need to create.
In the next post we’ll build and register the Vue components. View Part 5 here.